
I have wanted to make a Wonder woman soap ever since seeing the movie that came out in 2017. I felt pretty much like this girl after watching it. But like many ideas on my Soap idea list, it was buried by other soap projects. I even considered using the Wonder Woman TV show of the 70’s as inspiration for the TV show soap collab; which lead me to look up who created the character. When we saw the second movie, Wonder Woman 1984, the desire to make the soap came back, so here we are.
In the original movie, there is a scene where they give her a new outfit (instead of her WW costume), and it paid homage to Clark Kent / Superman. When we attended a Comic Palooza event, I decided to dress like that (or rather attempted), with items I had in hand:


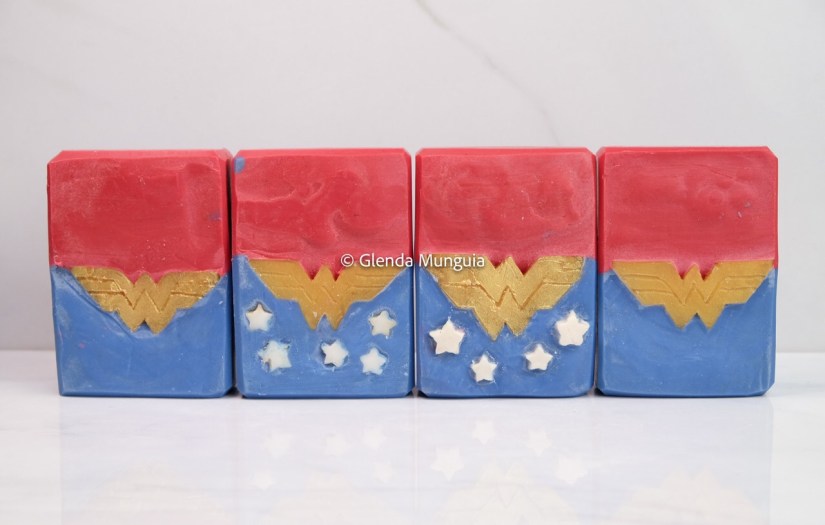
Because this is a copyrighted and trademarked themed soap, I am not allowed to make it for sale here in the US, but they became presents for my nieces last year.
I am listing below the recipe I used, materials, and above is a link to the video for the process (also detailed at the bottom of this post)
My affiliate links:
Several of the links above/below are affiliate links, as the ones below. If you buy from them, it will not cost you any more, and I would get a tiny commission on it. As amazon associate I earn from qualifying purchases.
For the Wonder woman logo Embeds
- Crystal Clear MP
- eXacto knife
- gold mica
- Print out of the logo in desired size
For the stars:
Colorants:
- 1 tsp Trial by Fire Mica (Red) for half of soap batter (11 oz)
- 1 tsp Kashmir Mica (Blue) plus 1/4 tsp Electric Blue Mica (for the remaining half of soap batter -10 oz)
- UPDATE:
I recently made this soap again, a 2 lb of oils batch and used these colorants for half of the batter: - 2 tsps of Midnight blue mica
- 2 tsps of Trial by Fire Mica
- I forced gel by covering the soaps and turning on a heating pad to high. Later I freaked out because I thought the melt and pour embed would melt, so I turned it off. I like how those soaps came out, will post a picture soon.
Mold:
Rectangle 4 cavity mold from Crafter’s Choice
Fragrance:
1 oz of Cranberry chutney from Lone star Candle
0.50 oz of Vanilla stabilizer (optional)
Equipment
- List of regular equipment
- Custom stamp (I 3d printed it)
- Sponge for stamp (or try with any sponge you may have at home)
- Hanger swirl tool
Safety Equipment:
- Nitrile gloves
- Facial Shield (I use either a facial shield or the goggles below)
- Safety Goggles
- Respirator (I use this when mixing the lye, I mix the lye in the window sill, window opened, with a pedestal fan blowing the fumes away, better yet, freeze your distilled water prior) I also try to wear long sleeves, pants and closed shoes. In my personal experience, most of my near misses (when I feel my skin itching or a slight burning sensation), or when I come contact with the soap batter, have happened when I am wiping down the containers, when I am almost done.
Recipe Totals
Please note that this recipe has a low superfat* percentage and a big water discount*. If you are a beginner, a recipe like this one might be better.
Recipe Totals
| Liquid Required | 3.59 oz | 101.7 g |
| NaOH Weight at 99 % Purity | 2.21 oz | 62.66 g |
| KOH Weight at 90 % Purity | 0.18 oz | 5.14 g |
| Lye Weight | 2.39 oz | 67.8 g |
| Oil Weight | 16 oz | 453.59 g |
| Fragrance Weight | 1 oz | 28.35 g |
| Super Fat | 2 % | |
| Total Batch Weight | 23.49 oz | 665.85 g |
| NaOH / KOH Ratio | 95 % / 5 % | |
| Lye Concentration | 40 % |
Recipe Oils, Fats and Waxes
| Oil | % | Ounces | Grams |
|---|---|---|---|
| Olive Oil | 30 | 4.8 | 136.08 |
| Tallow Beef | 30 | 4.8 | 136.08 |
| Coconut Oil, 76 deg | 25 | 4 | 113.4 |
| Castor Oil | 8 | 1.28 | 36.29 |
| Shea Butter | 7 | 1.12 | 31.75 |
| Total | 100 | 16 | 453.59 |
Custom Additives
| Add with the Fats | |
|---|---|
| Rosemary oleoresin | 0.01 oz |
| Add at trace | |
| EDTA mixed 1:1 with water | 0.23 oz total (half water 0.12 + 0.12 of EDTA) |
For more information on these additives you can click in the links below, please note above links are affiliate ones
- Rosemary oleresin (My oils already had this added when I masterbatched the oils)
- Tetrasodium EDTA
TO MAKE SOAP
- I start by making the embeds a few days ahead. I suppose you could make them the same day too if you have time.
- Prepare and melt the clear melt and pour, color with the gold mica and enviroglitter and pour into the cavity mold. Once hardened, trace the logo on top and cut out the negative space out.
- I attached the embeds to the mold with soap dough to keep in place.
- In a well ventilated area (outside or by a window), add the lye gradually to the distilled water. Do not breathe the fumes. You can freeze half of the water ahead to avoid fumes, and weigh the ice cubes. You need to wear your safety gear. Lye burns! You can prepare this several hours ahead, or even days ahead, keep it properly covered. (If making it the same day, loosely cover it to allow it to cool. Once at room temperature, use an airtight lid).
- While you wait for the lye water to cool down, you can weigh and melt your oils. Weigh your fragrance oil or essential oils into a glass container or ceramic container (fragrance oils can dissolve thin plastics). I masterbatch both the lye water solution and the oils, so I only need to weigh the amount needed each time.
- Weigh the vanilla stabilizer if using (depends on your fragrance and preference)
- When your oils and lye solution are at or below 110°F (37.77°C), put on your PPE (Personal protective equipment) again, and add your lye solution to the oils slowly, to avoid splatters pour it on the blender shaft. If your lye solution is cooler than this, is ok. As long as it not near freezing. (Room temperature is fine). If your oils go under 95° F, warm them up to lightly above 100° F
- Stir with the blender on Off position initially, then blend for 5-7 second periods, alternating with stirring for 10 seconds or longer, until it is emulsified. This takes about 30-50 seconds with this recipe. When a recipe reaches emulsion, everything has a uniform, lighter color than before, you do not see the darker oil swirls when blending.
- Split the soap batter into halves
- Mix the red and the blue colorants into each half, respectively
- Add half of the fragrance to each half, stir thoroughly
- Pour both colors at the same time on opposite ends of the cavity mold, like in the video.
- Cover to avoid soda ash and force gel by using a heating pad for the first five hours
- Wait 48 hours and try releasing from one side of the mold, and if nothing sticks back, it is ready to be removed from the mold and cut. If it still sticks, wait longer or put in the freezer for 1 hour.
need to wait a few more days to be able to stamp)
*SUPERFAT:
By now you probably know that lye (sodium hydroxide) converts oils into soap, through a process called saponification. And you probably also know that there are specific amounts needed of each for this to happen. Because each soap has a different SAPonification value, different amounts of lye are needed for each oil.
Superfatting sounds like something I like to do to myself when I keep eating after I feel full. But in the soap world, many will know it is when you either add more oils or less lye than it is required. Let’s say, hypothetically, that you need 3 oz of lye to convert 16 oz of manacao oil (totally made up oil) into soap. If you only use 2.5 oz of lye instead of 3, that means that a percentage of the manaco oil will not become soap, but will remain an oil. And this is desirable as that extra oil will cause the soap to become more gentle on your skin, by reducing its cleansing ability slightly. But if you use 4 oz of lye instead of 3, that means all 16 oz of manacao oil will become soap, and not only that, there will be extra lye floating around. That extra lye will be looking for more oil to convert to soap, that oil could be the natural skin oils, which means this soap can burn or irritate the skin.
Usually superfat of at least 3% is recommended as oils properties may change from crop to crop. But even if you had a 0% superfat soap, it would still be gentle as handmade soap creates glycerin, which is a skin humectant. (From most commercially produced soap, glycerin is removed to be sold separately).
*LYE CONCENTRATION / WATER DISCOUNT:
Most soap calculators will give you the amount of water needed to mix the lye with, based on traditional cooking methods of making soap, what we now know as hot process. This is a big percentage of water (38% of the oils) because a lot of it would evaporate through the cooking process. However, for cold process soap this is usually too much water, which can lead to a lot of soda ash or a lot of shrinkage during the cure.
This blogpost explains it better (from modern soapmaking).
