
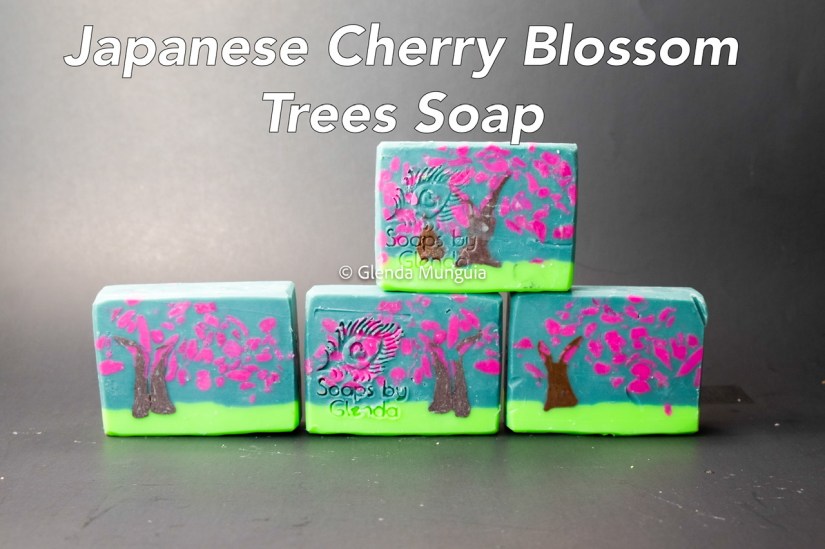
I like making a Japanese Cherry Blossom soap every year, and every year there is the challenge of the design, considering the fragrance causes the soap to thicken up rather quickly. Last year I opted for a close up of the blossoms, and this year is more of a landscape view of the tree. I usually choose light blue and light pink colors, but this time I went with a different palette. Overall, I am surprised they turned out good.
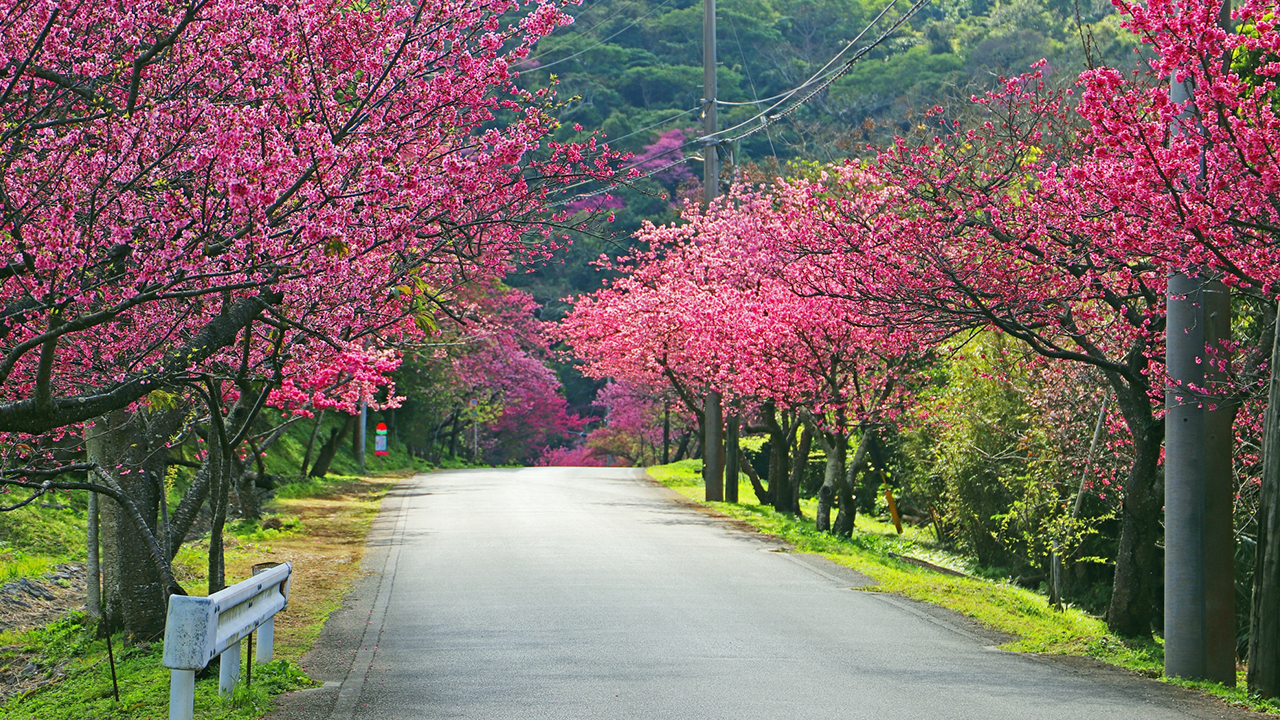
The inspiration photo was from a park in Okinawa:
And The idea of using the soap scraps came from Tara, a participant of the soapmaking forum garden challenge from last year. She made a beautiful Cherry blossoms soap with shredded soap
Here is what I used:
Recipe Totals
If you are a beginner, a recipe like this one might be better. This would be more of an intermediate project, once you have several batches under your belt. Below I am using a water discount, and a dual lye blend.
| Liquid Required | 2.85 oz | 80.81 g |
| NaOH Weight | 1.82 oz | 51.56 g |
| KOH Weight | 0.08 oz | 2.32 g at 90% Purity |
| Lye Weight | 1.9 oz | 53.87 g |
| Oil Weight | 13 oz | 368.54 g |
| Fragrance Oil Weight | 0.81 oz | 23.03 g |
| Superfat | 3% | |
| Total Batch Weight | 18.76 oz | 531.71 g |
| Lye Concentration | 40% | |
| NaOH / KOH Ratio | 97.2% / 2.8% |
Recipe Totals
| Liquid Required | 3.86 oz | 109.38 g |
| NaOH Weight | 1.82 oz | 51.56 g |
| KOH Weight | 0.08 oz | 2.32 g at 90% Purity |
| Lye Weight | 1.9 oz | 53.87 g |
| Oil Weight | 13 oz | 368.54 g |
| Fragrance Oil Weight | 0.81 oz | 23.03 g |
| Superfat | 3% | |
| Total Batch Weight | 19.77 oz | 560.57 g |
| Lye Concentration | 33% | |
| NaOH / KOH Ratio | 97.2% / 2.8% |
Custom Additives (Optional)
| Add with the Fats | |
|---|---|
| Rosemary oleoresin | 0.01 ounce |
| Add at trace | |
| EDTA mixed with distilled water (50/50) | 0.20 ounce |
For more information on these additives you can click in the links below, please note above links are affiliate ones
- Rosemary oleresin (My oils already had this added when I masterbatched the oils)
- Tetrasodium EDTA
My affiliate links:
Several of the links above/below are affiliate links, as the ones below. If you would like to support this blog, you can use them to buy any item from those stores, it will not cost you any more, and I would get a tiny % commission on it. As amazon associate I earn from qualifying purchases.
NURTURE SOAP
AMAZON
MAKE YOUR OWN
Colorants:
- Fluorescent Neon Green from Nurture Soap 1/4 tsp for 6 oz of soap batter
- Savage Green Mica from Nurture Soap 1/2 tsp for 12 oz of soap batter
Mold:
Fragrance:
Cherry Blossoms from Brambleberry (0.5 oz for dark green and 0.25 oz for neon green)
Embeds
I made the tree embed with Soap dough (brown and pink) and the flowers were soap scraps (failed soap dough), chopped.
Equipment
Safety Equipment:
- Nitrile gloves
- Facial Shield (I use either a facial shield or the goggles below)
- Safety Goggles
- Respirator (I use this when mixing the lye, I mix the lye in the window sill, window opened, with a pedestal fan blowing the fumes away, better yet, freeze your distilled water prior) I also try to wear long sleeves, pants and closed shoes. In my personal experience, most of my near misses (when I feel my skin itching or a slight burning sensation), or when I come contact with the soap batter, have happened when I am wiping down the containers, when I am almost done.
MAKING THE SOAP
You can watch the making of the soap here:
- First I made the embed, which is briefly shown in the video. I colored the soap dough with brown oxide pigment, since I did not have brown soap dough. Then I shaped the trunks including some pink on the branches, so that they blend better in the final soap, the way they do in nature.
- To make the soap, I normally heat up some of my masterbatched oils, weigh what I need and set it apart.
- Then I measure the masterbatched lye needed. However, if you do not masterbatch the oils or lye, I detail it below:
- In a well ventilated area (outside or by a window), add the lye gradually to the distilled water. Do not breathe the fumes. You can freeze half of the water ahead to avoid fumes, and weigh the ice cubes. You need to wear your safety gear. Lye burns! You can prepare this several hours ahead, or even days ahead, keep it properly covered. (If making it the same day, loosely cover it to allow it to cool. Once at room temperature, use an airtight lid).
- While you wait for the lye water to cool down, you can weigh and melt your oils. Weigh your fragrance oil or essential oils into a glass container or ceramic container (fragrance oils can dissolve thin plastics). I added the fragrance to each layer individually, because it accelerates.
- You can also mix the colorants into individual containers with about 1 tablespoon of olive oil.
- When your oils and lye solution are at or below 105°F (37.77°C), put on your PPE (Personal protective equipment) again, and add your lye solution to the oils slowly, to avoid splatters pour it on the blender shaft. If your lye solution is cooler than this, is ok. As long as it not near freezing. (Room temperature is fine). If your oils go under 95° F, warm them up to slightly above 100° F
- Stir with the blender on Off position initially, then blend for 5-7 second periods, alternating with stirring for 10 seconds or longer, until it is emulsified. This takes about 30-50 seconds with this recipe. When a recipe reaches emulsion, everything has a uniform, lighter color than before, you do not see the darker oil swirls when blending. It is better to err on the side of under blending that over blending for this soap, to keep it fluid.
- Distribute the soap batter among the colorants, for me this was 6 oz for neon green and 12 oz for dark green. I had the colorants mixed in the containers, so I mixed it thoroughly.
- Add the fragrance to the dark green and pour some in the mold, then add some of the pink scraps, add more green, then more scraps. Save some scraps for the end (the ones on the “grass”.
- When done adding the dark green color, insert the tree trunk embeds. Tap the mold against counter to burst air bubbles, add final pink scraps.
- Add fragrance and mix it with neon green and pour on top of previous layer.
- Cover with plastic to avoid soda ash if desired, and insulate to promote gel phase (cover with blanket)
- Wait 48 hours to remove from the mold and cut into bars
- Let the soap cure for at least 4 weeks in an open area protected from direct sunlight before using. (not touching any metal)
