
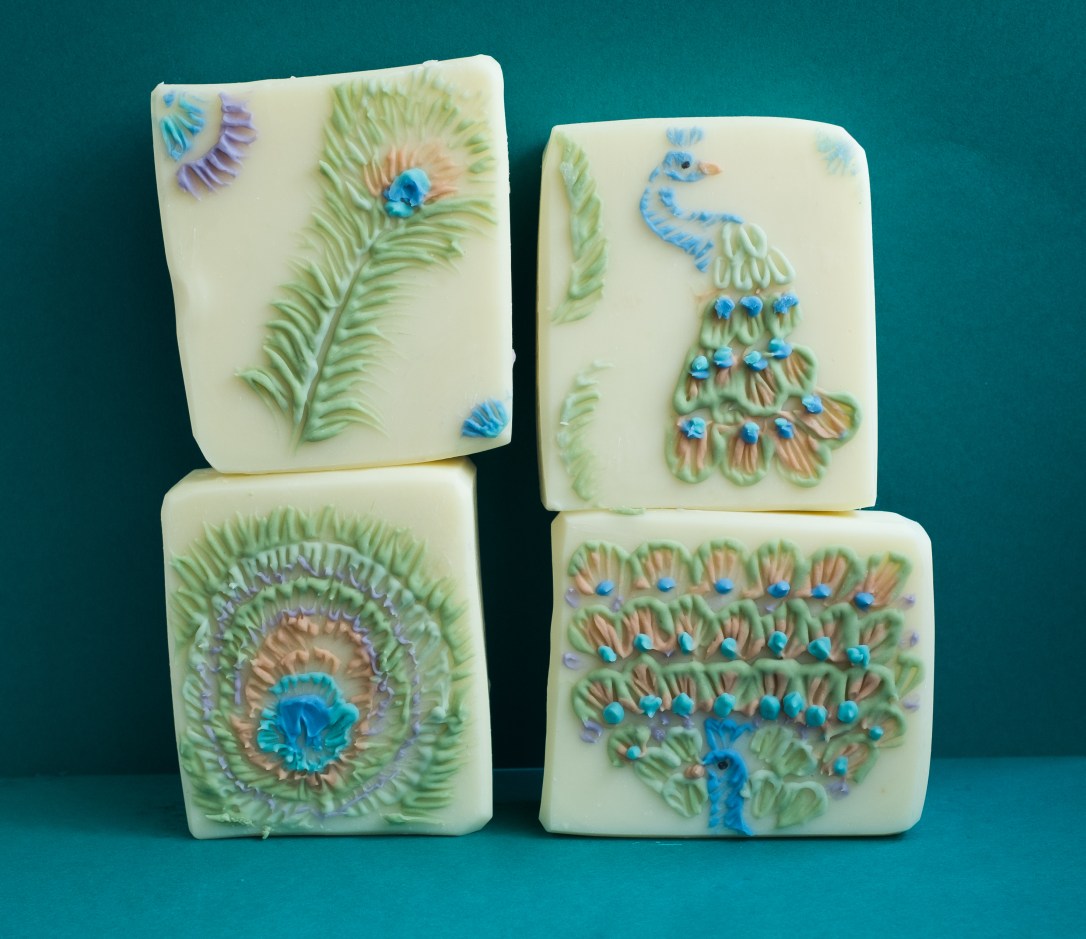
I got to make another peacock soap! this time with a different technique and it is for the soap challenge club. It is the embroidery technique which Soaping 101 first published in video several years ago. The first step was to make the “canvas” soap. Which I tried to make white. I did not quite accomplish this, but it was close enough. I do wish my colors were brighter and darker with the embroidery technique as well, I am afraid I did not use enough pigments.
I had a lot of fun making this, because as they say “time flies when you are having fun”. And it was 2 a.m. when I was done with the last soap! Thank God it was a Saturday!
I suppose it is because I like painting and I got to use a brush with this one. I painted almost every bar from the batch, and picked my favorite ones for the pictures.
Recipe For main soap:
Recipe Oils, Fats and Waxes
| Oil | % | Ounces | Grams |
|---|---|---|---|
| Tallow Beef | 26 | 14.04 | 398.03 |
| Coconut Oil, 76 deg | 22 | 11.88 | 336.79 |
| Olive Oil | 17 | 9.18 | 260.25 |
| Rice Bran Oil, refined | 15 | 8.1 | 229.63 |
| Shea Butter | 11 | 5.94 | 168.4 |
| Castor Oil | 9 | 4.86 | 137.78 |
| Total | 100 | 54 | 1530.87 |
Custom Additives
| Add with the Fats | |
|---|---|
| Titanium Dioxide | 2 tsp (I only used one, next time I would do 2) |
Recipe Totals
| Liquid Required | 11.23 oz | 318.41 g |
| NaOH Weight | 7.49 oz | 212.27 g |
| Oil Weight | 54 oz | 1530.87 g |
| Fragrance Oil Weight | 2.75 oz | 61.23 g |
| Superfat | 5% | |
| Total Batch Weight | 75.13 oz | 2129.79 g |
| Lye Concentration | 40% | |
| Liquid : Lye Ratio | 1.5 :1 |
Mold:
I used the tall and skinny mold I made a while back, it measures 12″ x 3″ x 4″
Fragrance
I used Sweet Orange and Chili pepper from Nature’s Garden. Although I love orange fragrances, this one would not be my favorite. It has a smoky and peppery note that I suppose is the “chili” portion of it, but the main problem is that I find the orange a bit artificial / candy like.

For embroidery technique (with lots leftover for soap dough)
Since I have masterbatched my oils, I used the same recipe for the embroidery portion. I know it can stay in medium trace for a while (like up to 2 hours) as long as I do not add fragrance. I kept the rest as soap dough (which was a lot! and I am happy about it)
Recipe Oils, Fats and Waxes
| Oil | % | Ounces | Grams |
|---|---|---|---|
| Tallow Beef | 26 | 4.16 | 117.93 |
| Coconut Oil, 76 deg | 22 | 3.52 | 99.79 |
| Olive Oil | 17 | 2.72 | 77.11 |
| Rice Bran Oil, refined | 15 | 2.4 | 68.04 |
| Shea Butter | 11 | 1.76 | 49.9 |
| Castor Oil | 9 | 1.44 | 40.82 |
| Total | 100 | 16 | 453.59 |
Recipe Totals
| Liquid Required | 4.31 oz | 122.09 g |
| NaOH Weight | 2.22 oz | 62.9 g |
| Oil Weight | 16 oz | 453.59 g |
| Fragrance Oil Weight | 0.64 oz | 18.14 g |
| Superfat | 5% | |
| Total Batch Weight | 23.17 oz | 656.72 g |
| Lye Concentration | 34% | |
| Liquid : Lye Ratio | 1.94 :1 | |
| Saturated : Unsaturated | 44:56 |
Colors:
I found that I had too many colors and the greens were very similar in tone. You may want to skip the Lily pad green (lighter green) or replace with a different one. I did not use the purple one until the very end when I realized I had forgotten it. I would suggest it is best to keep it simple, and perhaps only do 4 colors.
1/8 teaspoon of each below applied to 1/6 of the soap batter (I actually did not get to use the purple much, so you may adjust accordingly)
- 1/8 teaspoon Lily Pad Green Mica (Crafter’s Choice)
- 1/8 teaspoon Matte Woodland Green Pigment (Crafter’s Choice)
- 1/8 teaspoon Turquoise Teal Mica Powder (Crafter’s Choice)
- 1/8 teaspoon Purple Galaxy Mica Powder (Crafter’s Choice)
- 1/8 teaspoon Hammered copper mica (Crafter’s Choice) and 1/16 teaspoon Gold dust enviroglitter (this made this color keep some shimmer and glitter)
- 1/8 teaspoon Klein Blue Mica and 1/16 teaspoon of Electric Blue Mica (Nurture Soap)
Tools:
- Equipment and Supplies I use
- Synthetic fiber brushes. (I use a round skinny one, No. 3 like one of these)
- Piping bags (in a pinch, zip lock bags would do)
- Peacock lines template (I made these for smaller bars, 2.5 x 3.5 inches in dimensions). You could enlarge or reduce when printing.
Procedure:
I think soaping 101 explains is best. If you want to watch her video, it is here.
MAKING THE EMBROIDERY PORTION
Before this, you would need to make your canvas soap, you can watch the video for that here.
- If using the template above, print it and then put it on top of your soap, and draw on top of it, tracing the design with a pencil or pen to score lightly on your soap underneath. I free handed mine because I like to draw.
- Put on your safety gear. Lye burns! Plan to prepare the lye solution several hours ahead to allow it to come to room temperature.
- In a well ventilated area (outside or by a window), add gradually the lye to the distilled water and stir it with a metal spoon. I use a drink stirrer spoon, it has a long handle. Do not breathe the fumes (I use a respirator because I am sensitive to the fumes). You can freeze your water ahead to avoid fumes, and weigh the ice cubes (they weigh the same as if the water was in liquid form). The water/lye solution should go from cloudy to clear once it is dissolved. If you do not have a dedicated soap area/room and other people might come into contact with this, make sure you cover it, label it, tell everyone and keep it isolated, where it cannot be spilled or touched by accident.
- Wait for lye water to come to room temperature or at least to 92°F or 33°C While you wait for the lye water to cool down, you can weigh and melt your oils, and prepare the colorants.
- Measure, blend and melt your oils and let them cool down to about 100°F or 37.77°C
- Mix your micas with 1 teaspoon of a light colored oil, I used sunflower oil and I used a Mini mixer to do this.
- Once your oils and lye water have come to above temperatures, add your lye solution to the oils slowly, to avoid splatters pour it on the blender shaft.
- Stir with the blender on Off position initially, then blend for 15 second periods, alternating with stirring, until it is at light trace. This should only take 1 minute, 2 at the most.
- Pour the batter into smaller containers to color it.
- Add each color and stir with a spoon or spatula (I did it with the blender and it was too difficult actually, for these small amounts)
- Once the soap batter for each color look even and feel thick like pudding (medium trace), you can pour into piping bag and start playing. If it feels too runny, wait a few minutes and check back. (It will continue to harden in the bag, so no need to remove it if already in bag.
- Pipe part of your design and use the brush to pull streaks of soap from it. Start from the outside and work your way in. For the small peacock feathers you will need to pipe two lines, one green and one copper. Do one row of feathers at a time. If you mess up, just wipe and start over (either the entire thing, or just the part you don’t like, with a brush)
- For the longer single feather, pipe a very thick line (or double line) and drag the brush in very long, curved strokes. Then repeat for the other side.
- When done, take pictures! and you can share them with me if you do attempt it, or tag me on them, I would love to see it. Let the soap keep curing.
- Pipe the leftover soap into small cavity molds to have hand soaps. And/or cover (or leave it in the bags if you wish) to use as soap dough later.
